When is Enough, Enough?
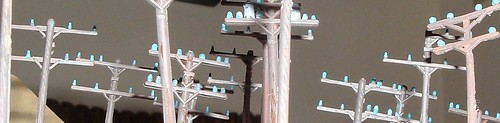
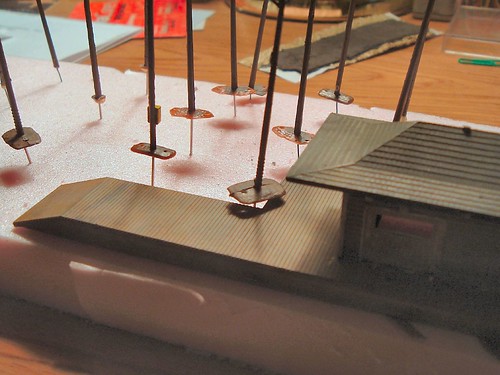
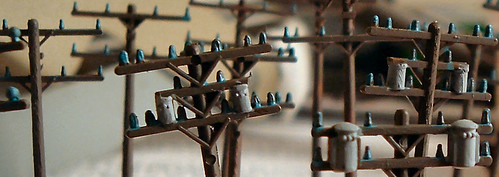
I spent some time last weekend working on telegraph poles.
Steps
Durn' tootin' it is, Bubba! |
posted by TexasT's at 8:24 AM
0 comments
![]()
![]()
My Continuing Adventures in NScale Model Railroading.
"Best viewed with Mozilla Firefox"

Feb 26, 2006 - Changes completed - for now...
Feb 24, 2006 - Changing my Template! Bear with me. This is a work in Progress!


It ain't the years, It's the mileage. I was raised a military brat, and wanderlust still comes over me every 3 or 4 years. Still love to travel.
I spent some time last weekend working on telegraph poles.
Steps
Durn' tootin' it is, Bubba! |
posted by TexasT's at 8:24 AM
0 comments
![]()
![]()
| Layout tours My previous posts about the Fall layout tours were: October 16th Visited A couple HO Railroads in Katy No pictures - just commentary October 30th Saw 3 Nice HO Layouts in the Houston Area Yesterday Also no pics. November 22d The Past Few Weekends I've Seen Some Great Layouts...Part I I didn't get out to see as much as I wanted to but I did see some nice stuff. November 6 was about the last day I could really get out and see some TRAINS! Been so busy with life and holidays and whatnot that I have not had time until now to really put this post together. So you can shoot me if you have to. So...All Aboard! First stop The HO Waterside Railway by Dennis Grigassy 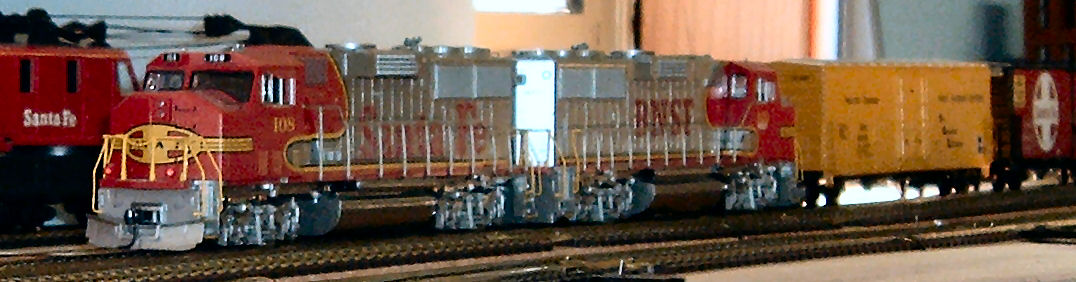 This is a bi-level, point to point modern railroad built for operations. Dennis has incorporated 1/2 dozen towns which have industries for switching. Tracklaying is complete and Dennis has plans to complete his scenery. He's even got an abandoned branch! There's an oval helix hidden (not really) in the garage. Most of his switches are manual with LED direction indicators. (I'll have to get him to show me that wiring trick one day). The ones out of reach are equipped with Tortoise switch machines. 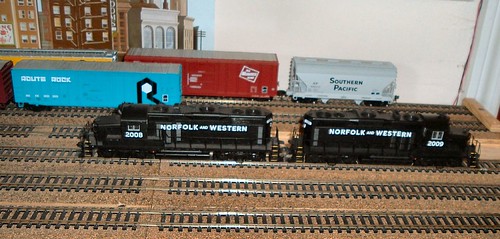 The yard (Staging area) is equipped with a cassette type tray for building trains. Control is Easy DCC. Dennis uses RailOp to Generate Waybills. Dennis was most helpful explaining how his layout was built. Even some of the pitfalls!  His co-engineer, David Ray (A well known O Scaler hereabouts) arranged meets for this amateur photog for which I am grateful. He even offered to stop the train so I could get the shot! But where's the fun in that!  Dennis even did a little demo for me on skewer uncoupling. 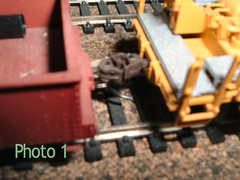 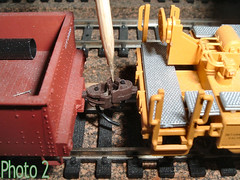 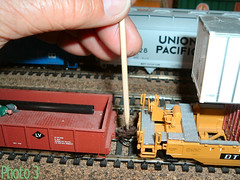 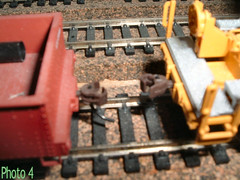 Photo 1 - Position your car. Photo 2 - Insert the skewer Photo 3 - Twist! Photo 4 - Move the train away. Wonder where he picked this car up? 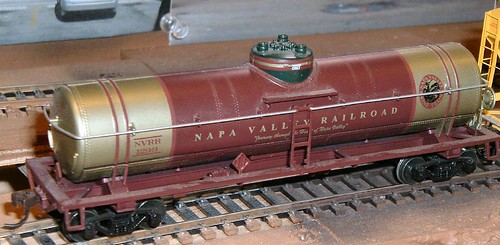 Thanks Dennis! Can't wait to see how you've progressed next year! 12 photos of this layout on flickr.com ____________________________________________________________________ My next stop was at the Fort Bend Model Railroad Club! The club has it's own website: FortBend Model Railroad Club. Located on the grounds of the Rosenberg RR Museum. This is a group with a sense of humor. You can tell from their website. And from some of their modeling. They are active at the train shows in and around the Houston area. In fact, their next gig is at The Worlds Greatest Hobby show in Houston at the George R Brown Convention Center in downtown Houston on January 7 and 8. I plan to be there on one of the days. C'mon down and show 'em some support. The club shows a 26' X 20' layout depicting Fort Bend County in the 1950's. The setup includes several award winning modules depicting the Imperial Sugar refinery in Sugarland, Texas in 1951. 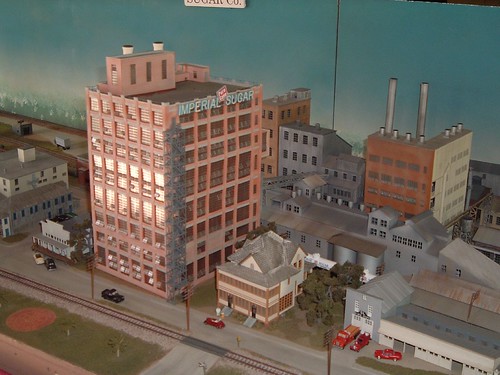 On the left a picture I shot of the refinery. I believe I got a history lesson about Imperial Sugar that day from Russell Straw, one of the creators of the modules. They have quite a bit of the history of the area as it pertains to railroading, of course, on their website and a lot of photographs. The modules that comprise the layout are well put together and show specific areas in the county as they appeared in the steam to diesel transition era. 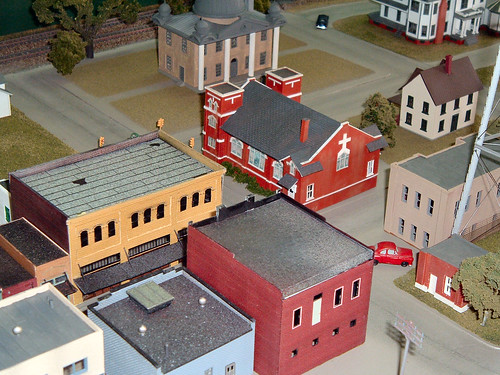 On the right is a shot of the Richmond, Texas module. 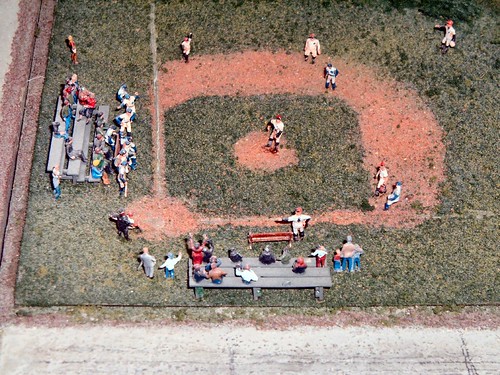 On the left how about a shot of America's favorite pastime.  On the right some of that fine EssPee Motive Power! 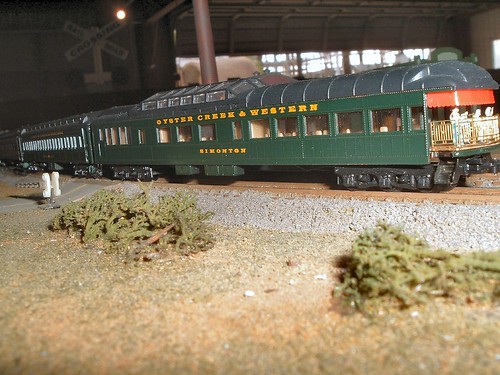 On the left it must be Party Time! Want to add a little sugar to your layout? The first club car of the FBMRC (Fort Bend Model Railroad Club), a reproduction of of a tank car actually used by the Imperial Sugar Company in the 1950s and 1960s. Produced in a special run by Micro-Trains Click here to purchase this model. This is the first time this authentic prototype design has been available in any model scale. It has been produced with the authorization and assistance of the Imperial Sugar Company, the oldest continuously operating company in Texas. The initial operation that became Imperial Sugar was founded in 1843, in what is now Sugar Land, Texas -- the home base of the FBMRC club.The picture below is of one of the actual production models. The cars come as a 2-pack, packaged together with a custom-printed wrapper and then shrink-wrapped to preserve the "factory air".  ____________________________________________________________________ The last and final tour I managed to do this year was Rick Townsend's Santa Fe in the 1950's. Rick has uploaded pictures of the layout on Yahoo! Photos 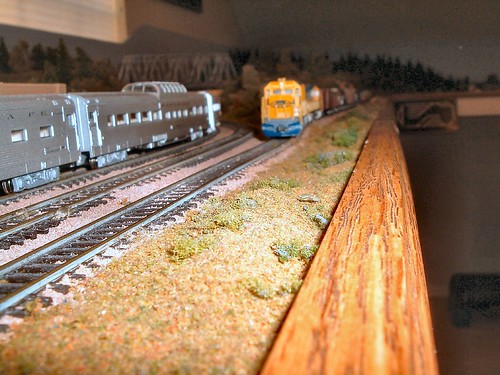 This L shaped 18 X 11 foot Railroad looks like a "built-in". It is built in such a way as to blend with the rest of the interior of the third floor room where it is located. Control is via dual Cabs. This is as good example of a "finished" layout as I've ever seen. If indeed a layout can ever be said to be "finished". Santa Fe in the 1950's is completely landscaped. At one end of the railroad is a good sized yard with a roundhouse and industries to be switched. The other end has a fully landscaped mountain with a town. He can run both around and point to point. Rick has put in a "Shell" refinery. I believe he said that it was a Shell because of the 2 large tanks he had acquired at one point. 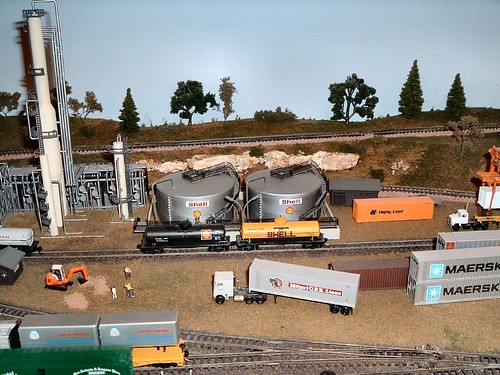 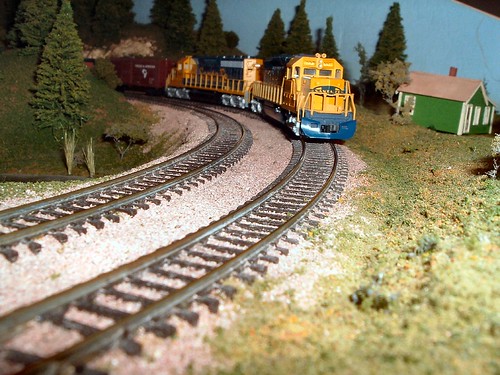 I think, for me anyway, landscaping is the thing. Rick's layou is superbly landscaped. A very nice level of detail on this layout. 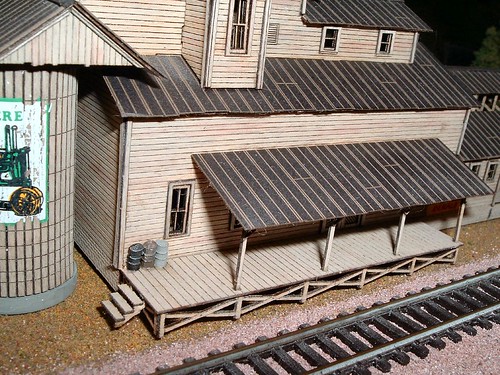 Look at the details in these 2 shots. These laser cut wood kits are Great! 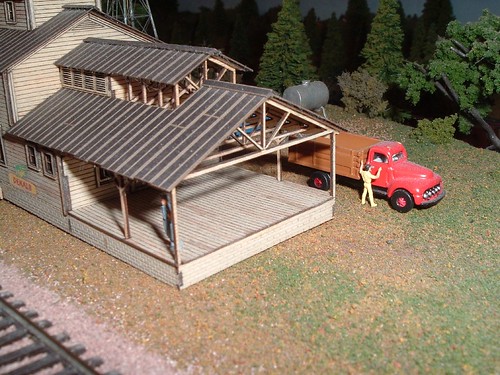 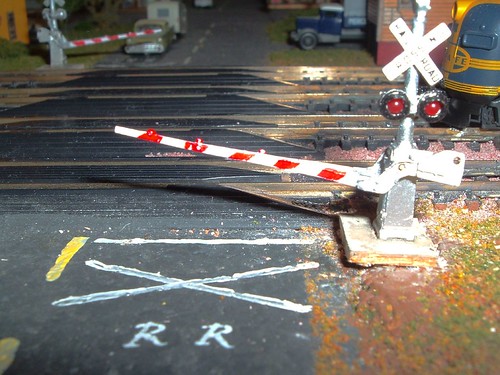 16 Photos of this layout on flickr. |
posted by TexasT's at 4:05 PM
0 comments
![]()
![]()
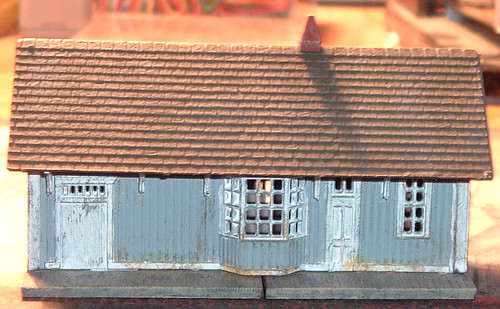
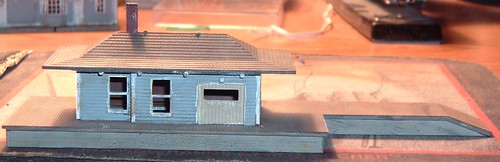
| Or should I say weeklong exploits as I was off from work all week. Although I spent more time at it this weekend that I did all week. Finally finished painting the rails "rusty". Distressed and painted a bunch of "telegraph" or "telephone" poles. Then I took a little detour and repainted a station I had, as my thinking is I'll use it for a cafe or "Greasy Spoon" trackside.
Looks kind of run down doesn't it? It may get a fresh coat after I decide for sure what to do with it. After that I also re-painted a little freight depot I had on hand.
Still have to get after the rail ties this week because of the "overpainting" I did when I was painting the rails. Hopefully I can shake loose a little time after work this week to get that taken care of. Also this weekend, I found in one of my myriad train "Stuff" boxes almost enough Atlas "Snap Track" to nearly re-lay all the track on my defunct "Scenic and Relaxed" Rail road.Score! That could be my next little project. I'll have to look more into converting it to C55 later. But I could probably do it in code 80 or 100 with the stuff I have on hand... |
posted by TexasT's at 9:27 AM
0 comments
![]()
![]()
| Heh Heh Heh... Got a job working at the World's Greatest Hobby on Tour Train show coming to Houston. Show dates are January 6 - 7, 2006. Working for one of the vendors at the show and they like to pay out in trains! Hot diggity! That means I get into the show for FREE! And I get the first look! I can't tell you the last train show I went to... I'll help them setup on Friday morning. And tear down on Sunday evening. I've asked if they need anything between then too. But I ain't counting on it... Could be an interesting weekend... |
posted by TexasT's at 3:47 PM
2 comments
![]()
![]()
| And to all a good night! nuff said... |
posted by TexasT's at 7:20 PM
0 comments
![]()
![]()
| Decided I really didn't like the way "Roof Brown" looked on the rails. So I'm repainting them again with Polly Scale "Rust". I think this will look much better against the ties and ballast. This is it! I'm done foolin' with the rails! Still gonna have a few ties to deal with though... DANG! But as Flash (@TB) says, "This hobby is supposed to take time!" |
posted by TexasT's at 6:44 AM
0 comments
![]()
![]()
I must've bought this 1 lb tub in the mid to late 90's (right before my divorce, but that's another story). I never used it on my previous layout. I was using emory paper then, painted grimy black. I found it in a box of my scenicking stuff. Hmmmmmm. Laid a base of permascene down on a piece of paper. Had to let that dry overnight. The next day I laid a test patch. It looks like it is still viable. Better yet, it looks just like asphalt! Brand new, just laid asphalt! I cannot find a viable reference for it, or the company on the web. The road in the pics is about 18 scale feet wide. Has not been sanded or sealed. 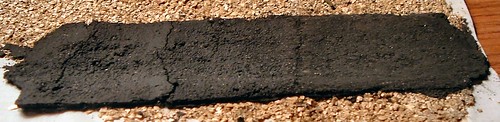 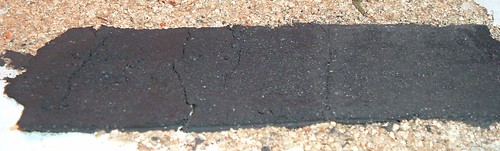 Did some research trying to find the company. Didn't come up with much but Walther's had this to say: Creative Customcraft is listed on Walthers.com along with I.S.L.E. Laboratories (Maybe owned by them?). Walthers Mfg # 473 Walthers Vendor 473 Same folks that bring you Mountains in Minutes. Various portals. Scenery materials. Rock castings made out of foam. Quite a few of these. Some kind of scenery foam. No Website as far as I can tell. No one on the forums I frequent has seen or heard of the stuff either. Here's a shot of the stuff on my module at the crossing. I sanded this application though, and it looks pretty good. 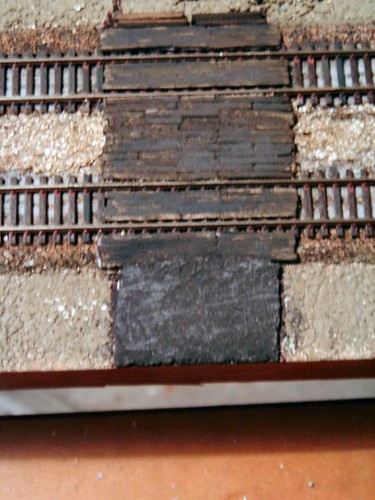 |
posted by TexasT's at 11:12 AM
0 comments
![]()
![]()
2. Painting Rails and Ties with 5. Ballasting Issues Together. Because they go...Together...Sort of. Painting rails with 18/0 and 10/0 brushes is: Let's face it...a good way to bring on a migraine. If you get them. I don't. But it didn't take me too long to find my super duper magnifying thingamabob! (Optivisor) I decided after the fiasco with the so called "Brown" paint pen and the "Brown" Sharpie that there was just a little tooo much RED in them. So I am toning it down a little with Polly Sca;e "Roof Brown". Why Polly Scale? Well it isn't solvent based, so it's easier to clean up. Soap and water, friends and neighbors is all it takes. And good ol' H2O will do, in a pinch, with a rag. I'm using waterbased paint and acrylics nearly exclusively an this module. And my old Poly Scale and acrylics haven't dried up nearly as bad as my old solvent based stuff from the years in storage. The colors are as good as solvent based paints anyway. And they are here. Why "Roof Brown"? Because it just looks better than anything else here on the rails. The operative word being "here". At this time of year there are really no spare bucks to spend on a "hobby" (The Queen thinks "Obsession"). And because well, I like it. It's my railroad! You can see it in this picture. Front rail on the right.  Here's a better shot. So that decision is made. And I'm a little less that half way through that job. But it is moving along. 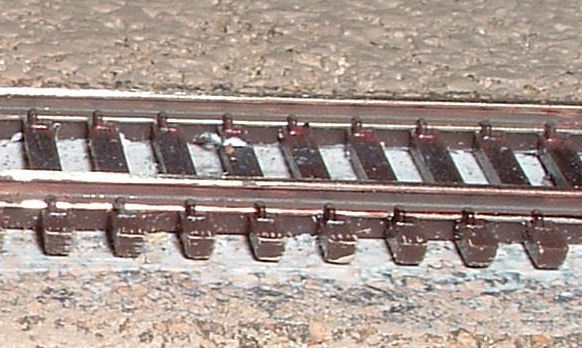 Now on to "Ballasting issues". I haven't done ballasting in a Loooooooooooooooooooonnnnnnnnnnnggggggggggg time. And it showed. I don't think true "Rock" ballast was available the last time I was buying. The last time I was buying, I bought alot of Woodland Scenics ballast. A LOT! Rumor has it that WS ballast is made from CRUSHED WALNUT SHELLS. And guess what Walnut shells do if not properly "wetted" down with a "Wet" solution (usually water with a few drops of diswashing detergent to break surface tension - I know about "surface tension because I'm a Model Railroader. Couldn't be, I've worked for a worldwide petrochemical manufacturer that makes "Surfactants" which by thier very nature break up surface tension in water. That's why they are one of the main ingredients in Detergents! For twenty-six years!). Some folks use IPA for this step. That's right. Plain old, garden variety isopropyl alcohol. So I decided to use this as well. Nevermind the fact it took me two nights (part-time) to get the ballast spread "just the way I wanted it" on a twelve inch stretch of track! What I didn't know at the time was I needed a "mister" for this and not a "sprayer". This shot is before cleaning 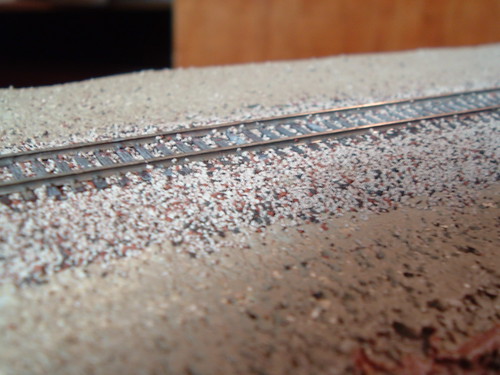 So as I "sprayed" my perfectly formed pyramids of crushed walnut shells, some of them MOVED. Up and over the ties (and Rails)(!!). HORRORS! Well by this time I was all in anyway. So angling my sprayer upwards, I continued until every thing looked nice and "wet". Got my bottle of WS "Scenic Cement" shook up and eye dropped the stuff every where up and down the track. (not quite as chaotically as it sounds) and I still had "float" Glue and ballast were floating between the rails! My ballast was not "wet" enough I found out later. No matter. After everything dried. And I let it go at least over night. Came back with a sharp instrument and removed most of the stray ballast from the sides of the rails and tops of the ties. Looks pretty good. My special mix of fine WS ballast is 2 parts Gray, 1 part cinders, and 1/3 to 1/2 part Iron oxide. And it looks okay. But there will be some procedural changes on the next section. I'll just have to see how that works. Anyway I think it all came out (mostly) all right! This shot is after the track was de-floated. And look at that rock face! 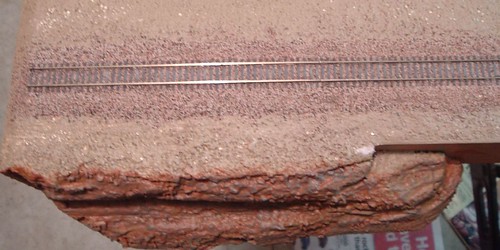 |
posted by TexasT's at 1:01 AM
0 comments
![]()
![]()
| Here's Number 6. New Micro Trains Heavy duty Flat. 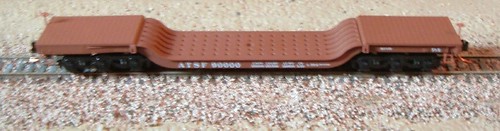 What a beaut! Sitting on my newly BALLASTED Section of track, too. Does that count as Number 5 in the list too? 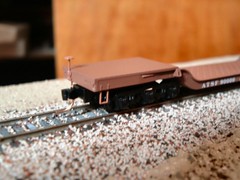 |
posted by TexasT's at 4:38 PM
0 comments
![]()
![]()
I AM working on a couple of major posts. All items from the list below. This weekend I should have some time to put a major dent in it. But let's take care of number 9 right now. Give Me a Chance...I Can Crack My Tailbone! Was in the garage earlier this week before I went to work. Wanted to take a couple of progress shots. I was sitting at my bench after getting the shots I wanted. I knocked something off the bench. A paintbrush...A screwdriver...I dunno...and I bent over while still seated to pick it up. ...And...(I know better) Who-o-o-o-o-sh!! Before I realized what was happening, the dang chair flew out from under my (you know whatsis!) and I found myself sitting somewhat painfully on the floor. This chair actually sits about barstool height so it was just enough distance to hurt really good. I pushed the chair caster out of my crack and lay back on the floor. The feeling in my lower back was...familiar somehow. Oh yeah! Now I remember...Damn Damn DAMN! Several years ago after a stupid stunt. I had cracked my sacrum. It took literally years before if felt good to sit, lay or even walk, comfortably, really. As I lay there on the floor, hoping against hope that I had just bruised that pointy little piece of bone, I realized I still had to get my ass up and go to work... Not a fun way to start your day... Crap! |
posted by TexasT's at 1:24 PM
0 comments
![]()
![]()
| I've been busy with "The Project", around the House, and at Work. So, not much time for writing. The Project Got plenty of things done over the last 7 days (If you are a snail, that is). Work on the module (I guess "the Project really is a "Module") is progressing, but at a slower pace thanks to end of year stuff at work and (of course) the Holiday Season. Fa-la-la-la and all that happy crap. I'll do a quick rundown of what's to do and done and hopefully post pictures and more details later.
Gotta run! More later... |
posted by TexasT's at 11:52 AM
0 comments
![]()
![]()
Rock Faces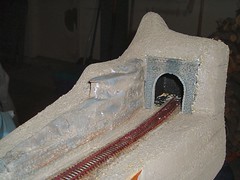 So I decided (yesterday or the day before really) that I didn't like the way my rock faces were turning out. Too much gray I guess. Not enough of anything else. Plus I've done some other reading lately, that kind of made me decide whatever was wrong it just wasn't working for me. I just can't really put my finger on what it is that isn't working...I've been thinking about what I can do to fix this. So I repainted them with my tan base tonite. So I decided (yesterday or the day before really) that I didn't like the way my rock faces were turning out. Too much gray I guess. Not enough of anything else. Plus I've done some other reading lately, that kind of made me decide whatever was wrong it just wasn't working for me. I just can't really put my finger on what it is that isn't working...I've been thinking about what I can do to fix this. So I repainted them with my tan base tonite.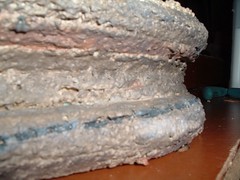 Except for this piece, maybe I kept it to remind me of what NOT to do? I dunno, I kind of like this one. It's the one piece I've kept as removable rock. I'll put some kind of foreground feature on it and detail it out really nicely. Maybe a wood kit of some kind I can turn into some kind of greasy spoon for the train crews. Gotta have something on this side of that crossing, eh? Except for this piece, maybe I kept it to remind me of what NOT to do? I dunno, I kind of like this one. It's the one piece I've kept as removable rock. I'll put some kind of foreground feature on it and detail it out really nicely. Maybe a wood kit of some kind I can turn into some kind of greasy spoon for the train crews. Gotta have something on this side of that crossing, eh?Civil Engineering Project After I posted one of the pictures I posted here on Monday later on Trainboard, I got a few comments back. Notably one from PowerSteamGuy that basically said, "That's nice. Why don't you paint it with some Rail Tie Brown and after that dries, dry brush with some grimy black." Everybody that commented said it looked really bumpy... Well that was the idea! It's supposed to rural and not that well maintained.... Hey, it sounded good to me...So I sanded it a little and gave the thing a coat of Polly Scale Rail Tie Brown. And puttered around waiting for it to dry. I'm still trying to fix my fiasco of painting the rails with a brown paint pen that makes the rails look this awful shade of Red. I even took the paint pen and painted some of the scenery base with it to see if it just reacted with the metal to turn it that color. It didn't. It wasn't even brown on my painted scenery base. They shouldn't be able to sell that as a shade of Brown. 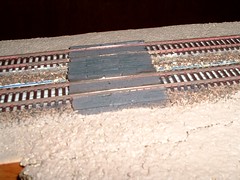 So I screwed around with that for a while and went back in the house after a while. Trouble was when I came back around to it, it was probably ten thirty or eleven o'clock. I must've been too tired. I didn't just drybrush the thing...I buried it in grimy black! My new found buds at TB wasted no time in telling me about either! PSG said, "Give it another coat of Rail Tie Brown and then DRY BRUSH it with grimy black." Flash said he liked it better BEFORE the paint at all. And skipgear posted a picture from one of his grade crossings! With pointers! It was Great! So I screwed around with that for a while and went back in the house after a while. Trouble was when I came back around to it, it was probably ten thirty or eleven o'clock. I must've been too tired. I didn't just drybrush the thing...I buried it in grimy black! My new found buds at TB wasted no time in telling me about either! PSG said, "Give it another coat of Rail Tie Brown and then DRY BRUSH it with grimy black." Flash said he liked it better BEFORE the paint at all. And skipgear posted a picture from one of his grade crossings! With pointers! It was Great!It was all good in my opinion! So after I got home from work I gave the durn thing another coat of paint waited around for that to dry and did the drybrush thing...And sanded it ALL off again. I think the two coats of paint were just too much for my liking. Gave it yet another coat initial coat. Sanded a little bit And drybrushed...And this is how it came out. 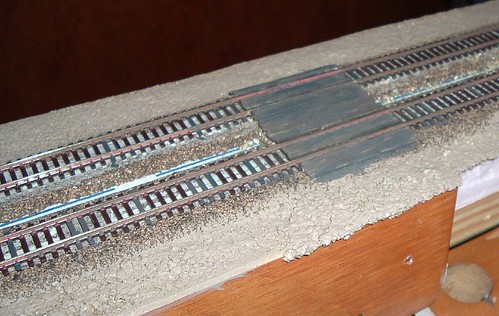 Not too shabby in my humble opinion! Can't wait to detail this out! |
posted by TexasT's at 9:02 PM
1 comments
![]()
![]()
| I played civil engineer today. Had an idea for a grade crossing. This is about 22 scale feet wide. Made from Micro Engineering RR ties. Now that I've got the thing installed it's probably a little wide for my original purpose, but it'll do, I think. Once the glue sets, I'll sand the assembly a little. I just want to make sure every thing will clear it. Then repaint in grimy or weathered black, I think. The lighting in my garage really makes the track look awful. Looks like I need to take another look at that. 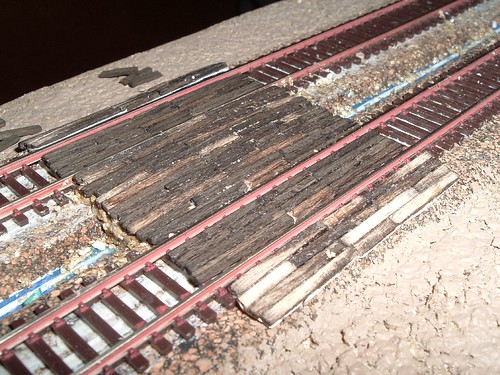 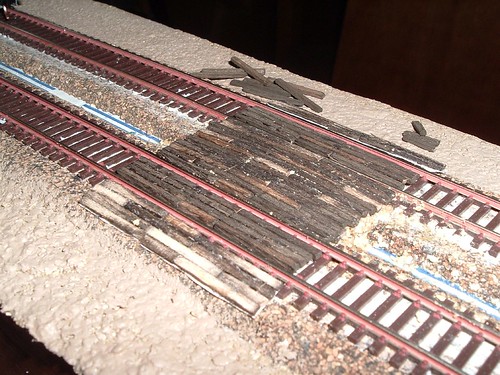 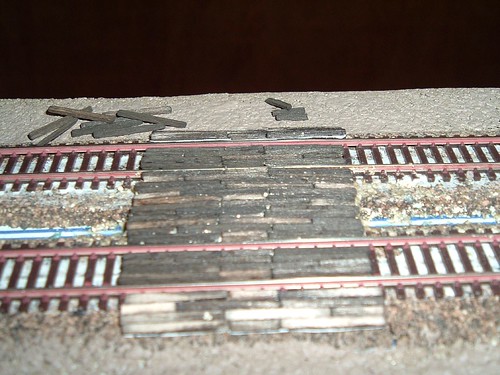 Also got the rest of my little project painted tan. I guess it is about time to think about ballasting the trackage. After I repaint the track...(sigh) |
posted by TexasT's at 3:52 PM
1 comments
![]()
![]()
| Made some progress this weekend in addition to the coupler follies... Got most, if not all, of the scenery base down. Finally! Have permascene almost every where (don't ask!) I've painted about 80% of that with my tan paint. Painted the interior of the tunnel entrance with Mars Black acrylic paint. Glued in the over the tunnel scenery and covered that with my scenery material. Been experimenting with painting various rock formations. Finally got a combination I think I like. We'll see after the base dries and I can paint everthing that's left with my base color. Got one of my formations painted but I'm not sure I like what I've got. It's basically various shades of brown with a little rust color and black thrown in for competition. Then I dry brushed with 2 different shades of gray. Not sure I like what I'm seeing so I've decided to sleep on it. Haven't taken any pictures of it yet either. Happy Trails! |
posted by TexasT's at 7:44 PM
0 comments
![]()
![]()
| I'm told that the F7-A MT conversion is one of the more difficult conversions to do. Wouldn't you know that would be the first one I would do. The pilot on my F7, while not exactly toast, does need some work at this point. But the coupler is in and looks like it will be functional when I go to test it. It is at the right height and angle. Maybe a little high but hey, it's in there! Thanks to the Nscale folks @ TB (TB = TrainBoard.com). They were helpful with advise and encouragement. The rear coupler went in relatively easily (see last post). The pilot though, turned out to be a woolybugger. The opening in the pilot needed to be enlarged. I had to do this several times. Upon re-assembly the pilot cracked. In three places. I'm told by Big Snooze @ TB that Sunrise Enterprises sells a replacement for a few dollars. I'll look into that the next time I'm at PapaBen's. Plus the angle was all wrong and it wouldn't couple to the MT coupler height gauge. Because the height and angle were screwed. So I took it apart and the coupler fell apart. Got the coupler back together and checked it against the Draft Gear clip. The two posts that held the rapido coupler in place would not let the MT settle into place properly. Filed about half of those away, re-assembled the thing and... Eureka! The coupler is in! At almost the right height too. It does couple to the gauge. I don't really plan to couple anything to the front end of the F7 A anyway, so I might eventually take PowerSteamGuy's (@TB) advise and put in a ZScale coupler. But not right now... 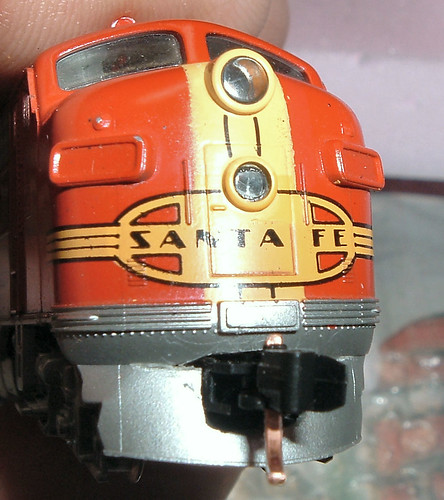 Ahh...The sweet smell of SUCCESS!! |
posted by TexasT's at 8:45 AM
0 comments
![]()
![]()
| With Micro Trains couplers... I started this little project last night. And of course I picked the pride of my fleet to go first - A Kato EMD F7A Unit. First lemme say these parts are Waaaaay too small to be screwing around with at 1130 at night! So after reading the instructions all the way through and looking at these tiny parts, I (and using my better judgement for a change) decided to sleep on it after posting a question or two on TrainBoard.com in bold text below. Looking at the instructions it says in Step 6 , "Trim original spring post to allow the 1128 adapter to slip into draft gear box. Do not trim more than is needed as this post will help retain adapter until adhesive sets." Adhesive?!? Who knew? So how much to trim? It looks like I'll need to take most of the post off any way just so the adapter will fit. Do I saw it off with a no. 11 blade? or what? In step 14 it says to apply a small amount of "Walthers Goo" Is anything a reasonable substitute for "Walthers Goo"? Or do I need to make a trip to LHS to get some? "Flash" Blackman replied that I would indeed need to take most of (all, actually) the post off to make the adapter fit. Further I would need to enlarge the opening in the pilot in order for the coupler to fit. It said so in the instructions from MT as well. "OH SHIT!" was my only thought. But in for a penny, in for a pound, as the saying goes. And yes, "Goo" would be best as well, he said. Taking this loco apart (this morning) was one of the scariest things I have done in a while...But I must say that went well...When the headlight and porthole plastic(s) fell off though, I decided THAT was not going to happen again, so I glued them in. The Rear Coupler... I worked on the rear coupler until I got to the point where I needed the "Goo". Made a couple of calls for that, only to discover I was gonna have to drive all the way across town to get it. Might as well pick up the MT Greasem while I was there. Still, I got outta there for under 6 bucks. That's probably the least amount of money I've ever spent in a LHS. EVER! I should show that receipt to the Queen! "Take that! I can too get outta one of these stores without spending my paycheck!" Meanwhile, back at the hacienda... 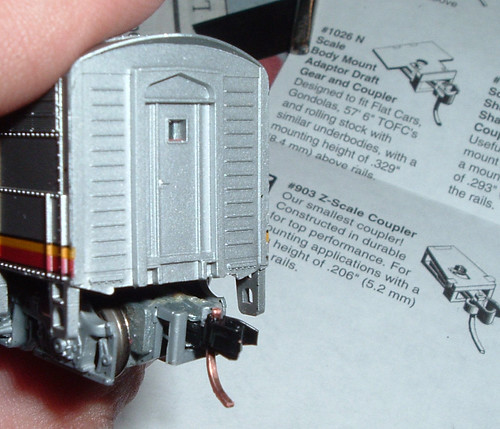 The rear coupler mounted to the truck without (almost) a hitch. The little T-bars on the end of the shank(s) gave me a little trouble. But then the thing just fell into place. Put the truck back on, and the shell went back on just like the instructions said. The rear coupler looks perfect. Needs some grimy black and some rust and dirt and... but that can wait for now. The durn thing is in! The rear coupler mounted to the truck without (almost) a hitch. The little T-bars on the end of the shank(s) gave me a little trouble. But then the thing just fell into place. Put the truck back on, and the shell went back on just like the instructions said. The rear coupler looks perfect. Needs some grimy black and some rust and dirt and... but that can wait for now. The durn thing is in!I must admit to a boost in confidence since that went so well. Now for the Front Coupler. Comparing the coupler to the opening in the pilot, it looked like I was going to have to enlarge it quite a bit. So I got a fresh No.11 blade and one of my fine Xacto files and enlarged it. And enlarged it more. And enlarged it some more. Until It looked like (to me, anyway) you could drive a truck through it. The coupler fit, but it was tight. Hmmm this is going well, I thought humming to myself... 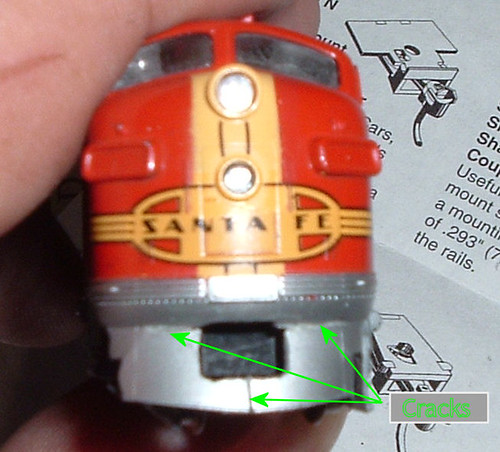 Until the very last step when I cracked the pilot. It's cracked really good too! In three places. It's cracked on either side of the coupler as well as at the bottom. I figure I must've weakened it as I was enlarging the hole in the pilot. I don't think I can repair these...It cracked when I was inserting the pilot draft gear clip. Until the very last step when I cracked the pilot. It's cracked really good too! In three places. It's cracked on either side of the coupler as well as at the bottom. I figure I must've weakened it as I was enlarging the hole in the pilot. I don't think I can repair these...It cracked when I was inserting the pilot draft gear clip.And another thing. The coupler is off at a really odd angle. Then, as I pulled the Draft Gear Clip off to disassemble my previous assembly so I could see if I could figure that out, the coupler came apart. I've got all the pieces, thank goodness... 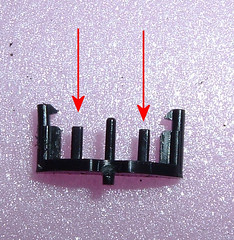 Here's the thing though. There are three posts on the thing. The one in the center goes through the coupler. The ones on either side I suppose are to hold the coupler steady. However, these are what is interferring with the coupler sitting straight, I know now. There's another set of questions for my friends at TrainBoard.com. Here's the thing though. There are three posts on the thing. The one in the center goes through the coupler. The ones on either side I suppose are to hold the coupler steady. However, these are what is interferring with the coupler sitting straight, I know now. There's another set of questions for my friends at TrainBoard.com.Now I'll eventually need to score a new shell for that, I suppose. But the rear coupler works and is actually at the right height and everything. But it couples to the coupler height check gauge! A learning experience I reckon. Does Kato sell shells? |
posted by TexasT's at 7:47 PM
2 comments
![]()
![]()
End of the line folks! Every body off the train!
All images and text © 2006 TexasT's unless otherwise credited.
www.flickr.com
|