I spent some time last weekend working on telegraph poles. 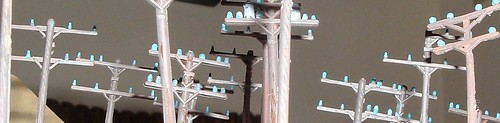
One might ask, "Aren't they good enough right out of the box? "
One would get the answer, "Maybe for some. But not for me."
How to detail a telegraph pole.
Materials required:
- Telegraph poles
- Xacto knife with fresh No.11 blade(s) - depending on how many poles you have.
- Razor Saw
- Polly Scale paints: Weathered (or grimy) Black, Rail Tie Brown , Some form of Bright Blue, and New Gravel Gray are what I used.
- Maybe a fine Jeweller's file.
- 2 Paint brushes - one needs to be a 15/00 or better. About 7 hairs will do.
- Pin Vise and a No. 57 Drill or whatever works for you.
- Floral Wire or straight pins.
- ACC cement.
Steps - Remove one set of cross arms - I usually take out the middle one. There are exceptions. Use the exacto knife or a pair of nippers. Option: The little "V" supports can usually be excised as well. Note: I haven't done this step yet.
- Score the "pole" part with the razor saw by running it straight up and down the pole, all the way around the pole. Be careful not to exert to much pressure on the pole because it will snap!
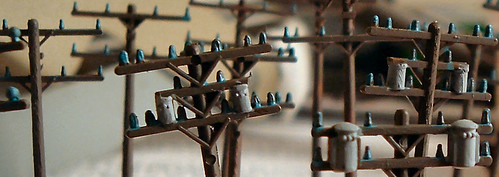
- Get out your trusty paintbrush and the rail tie brown (or weathered or grimy black for variety) paint and give the entire pole a coat. Set aside and do the next one.
- Once the paint dries, get out your seven hair brush and your bright blue paint and paint the insulators Blue.
- Clean the brush and get out the new gravel gray paint and paint the cylindrical transformers that are on some of the poles and set aside to dry.
Now you can be finished at this point. But I went a step or two further.
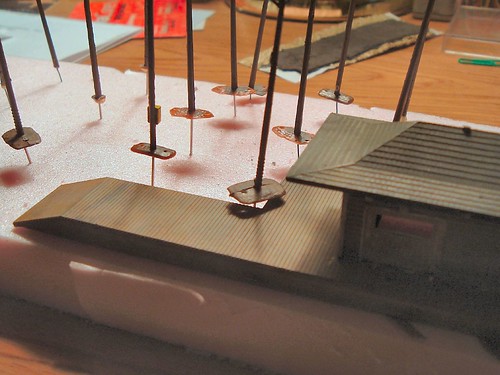
- Snap off the flat base at the bottom of the poles.
- Drill a hole in the bottom of the pole, large (and deep) enough to either stick floral wire in the end or the sharp end of a straight pin in the end. (I used both for testing purposes) If you used a pin, get out a pair of wire cutters and snap off the head. If you used the wire, cut it to a length you are comfortable with. Really depends on what your scenery base is.
- Put a drop (a smidge really) of ACC on the end of the wire or pin and stick it in the hole you drilled in the pole. Set aside to dry and move on to the next one.
Now the poles are ready to be installed. Depending on your scenery base, you may need to pre-drill a hole to "plant" your pole in with a drop of white glue.
But the question remains:
But is it art?
Durn' tootin' it is, Bubba!
|


Comments on "When is Enough, Enough?"
post a comment