


About That List
2. Painting Rails and Ties with 5. Ballasting Issues Together. Because they go...Together...Sort of. Painting rails with 18/0 and 10/0 brushes is: Let's face it...a good way to bring on a migraine. If you get them. I don't. But it didn't take me too long to find my super duper magnifying thingamabob! (Optivisor) I decided after the fiasco with the so called "Brown" paint pen and the "Brown" Sharpie that there was just a little tooo much RED in them. So I am toning it down a little with Polly Sca;e "Roof Brown". Why Polly Scale? Well it isn't solvent based, so it's easier to clean up. Soap and water, friends and neighbors is all it takes. And good ol' H2O will do, in a pinch, with a rag. I'm using waterbased paint and acrylics nearly exclusively an this module. And my old Poly Scale and acrylics haven't dried up nearly as bad as my old solvent based stuff from the years in storage. The colors are as good as solvent based paints anyway. And they are here. Why "Roof Brown"? Because it just looks better than anything else here on the rails. The operative word being "here". At this time of year there are really no spare bucks to spend on a "hobby" (The Queen thinks "Obsession"). And because well, I like it. It's my railroad! You can see it in this picture. Front rail on the right.  Here's a better shot. So that decision is made. And I'm a little less that half way through that job. But it is moving along. 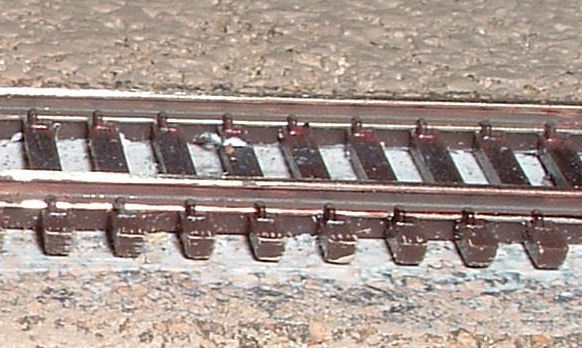 Now on to "Ballasting issues". I haven't done ballasting in a Loooooooooooooooooooonnnnnnnnnnnggggggggggg time. And it showed. I don't think true "Rock" ballast was available the last time I was buying. The last time I was buying, I bought alot of Woodland Scenics ballast. A LOT! Rumor has it that WS ballast is made from CRUSHED WALNUT SHELLS. And guess what Walnut shells do if not properly "wetted" down with a "Wet" solution (usually water with a few drops of diswashing detergent to break surface tension - I know about "surface tension because I'm a Model Railroader. Couldn't be, I've worked for a worldwide petrochemical manufacturer that makes "Surfactants" which by thier very nature break up surface tension in water. That's why they are one of the main ingredients in Detergents! For twenty-six years!). Some folks use IPA for this step. That's right. Plain old, garden variety isopropyl alcohol. So I decided to use this as well. Nevermind the fact it took me two nights (part-time) to get the ballast spread "just the way I wanted it" on a twelve inch stretch of track! What I didn't know at the time was I needed a "mister" for this and not a "sprayer". This shot is before cleaning 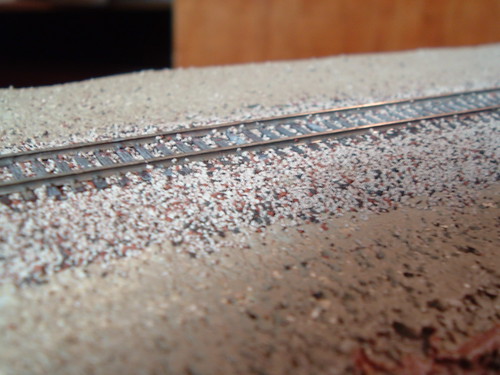 So as I "sprayed" my perfectly formed pyramids of crushed walnut shells, some of them MOVED. Up and over the ties (and Rails)(!!). HORRORS! Well by this time I was all in anyway. So angling my sprayer upwards, I continued until every thing looked nice and "wet". Got my bottle of WS "Scenic Cement" shook up and eye dropped the stuff every where up and down the track. (not quite as chaotically as it sounds) and I still had "float" Glue and ballast were floating between the rails! My ballast was not "wet" enough I found out later. No matter. After everything dried. And I let it go at least over night. Came back with a sharp instrument and removed most of the stray ballast from the sides of the rails and tops of the ties. Looks pretty good. My special mix of fine WS ballast is 2 parts Gray, 1 part cinders, and 1/3 to 1/2 part Iron oxide. And it looks okay. But there will be some procedural changes on the next section. I'll just have to see how that works. Anyway I think it all came out (mostly) all right! This shot is after the track was de-floated. And look at that rock face! 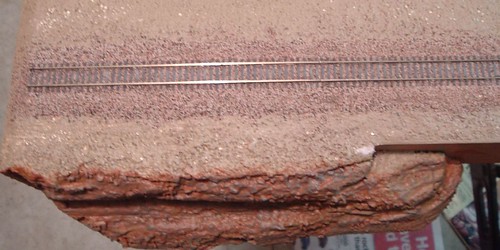 |
posted by TexasT's at 1:01 AM
![]()
![]()
Comments on "About That List"
post a comment