


My First Coupler Conversion For a Locomotive Part 1
| With Micro Trains couplers... I started this little project last night. And of course I picked the pride of my fleet to go first - A Kato EMD F7A Unit. First lemme say these parts are Waaaaay too small to be screwing around with at 1130 at night! So after reading the instructions all the way through and looking at these tiny parts, I (and using my better judgement for a change) decided to sleep on it after posting a question or two on TrainBoard.com in bold text below. Looking at the instructions it says in Step 6 , "Trim original spring post to allow the 1128 adapter to slip into draft gear box. Do not trim more than is needed as this post will help retain adapter until adhesive sets." Adhesive?!? Who knew? So how much to trim? It looks like I'll need to take most of the post off any way just so the adapter will fit. Do I saw it off with a no. 11 blade? or what? In step 14 it says to apply a small amount of "Walthers Goo" Is anything a reasonable substitute for "Walthers Goo"? Or do I need to make a trip to LHS to get some? "Flash" Blackman replied that I would indeed need to take most of (all, actually) the post off to make the adapter fit. Further I would need to enlarge the opening in the pilot in order for the coupler to fit. It said so in the instructions from MT as well. "OH SHIT!" was my only thought. But in for a penny, in for a pound, as the saying goes. And yes, "Goo" would be best as well, he said. Taking this loco apart (this morning) was one of the scariest things I have done in a while...But I must say that went well...When the headlight and porthole plastic(s) fell off though, I decided THAT was not going to happen again, so I glued them in. The Rear Coupler... I worked on the rear coupler until I got to the point where I needed the "Goo". Made a couple of calls for that, only to discover I was gonna have to drive all the way across town to get it. Might as well pick up the MT Greasem while I was there. Still, I got outta there for under 6 bucks. That's probably the least amount of money I've ever spent in a LHS. EVER! I should show that receipt to the Queen! "Take that! I can too get outta one of these stores without spending my paycheck!" Meanwhile, back at the hacienda... 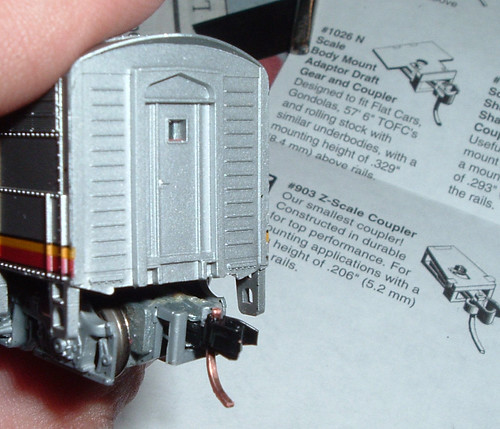 The rear coupler mounted to the truck without (almost) a hitch. The little T-bars on the end of the shank(s) gave me a little trouble. But then the thing just fell into place. Put the truck back on, and the shell went back on just like the instructions said. The rear coupler looks perfect. Needs some grimy black and some rust and dirt and... but that can wait for now. The durn thing is in! The rear coupler mounted to the truck without (almost) a hitch. The little T-bars on the end of the shank(s) gave me a little trouble. But then the thing just fell into place. Put the truck back on, and the shell went back on just like the instructions said. The rear coupler looks perfect. Needs some grimy black and some rust and dirt and... but that can wait for now. The durn thing is in!I must admit to a boost in confidence since that went so well. Now for the Front Coupler. Comparing the coupler to the opening in the pilot, it looked like I was going to have to enlarge it quite a bit. So I got a fresh No.11 blade and one of my fine Xacto files and enlarged it. And enlarged it more. And enlarged it some more. Until It looked like (to me, anyway) you could drive a truck through it. The coupler fit, but it was tight. Hmmm this is going well, I thought humming to myself... 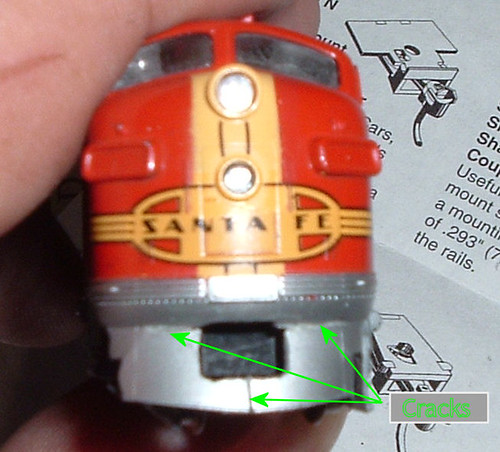 Until the very last step when I cracked the pilot. It's cracked really good too! In three places. It's cracked on either side of the coupler as well as at the bottom. I figure I must've weakened it as I was enlarging the hole in the pilot. I don't think I can repair these...It cracked when I was inserting the pilot draft gear clip. Until the very last step when I cracked the pilot. It's cracked really good too! In three places. It's cracked on either side of the coupler as well as at the bottom. I figure I must've weakened it as I was enlarging the hole in the pilot. I don't think I can repair these...It cracked when I was inserting the pilot draft gear clip.And another thing. The coupler is off at a really odd angle. Then, as I pulled the Draft Gear Clip off to disassemble my previous assembly so I could see if I could figure that out, the coupler came apart. I've got all the pieces, thank goodness... 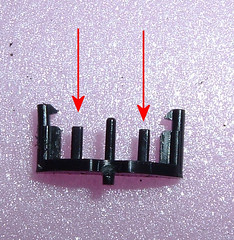 Here's the thing though. There are three posts on the thing. The one in the center goes through the coupler. The ones on either side I suppose are to hold the coupler steady. However, these are what is interferring with the coupler sitting straight, I know now. There's another set of questions for my friends at TrainBoard.com. Here's the thing though. There are three posts on the thing. The one in the center goes through the coupler. The ones on either side I suppose are to hold the coupler steady. However, these are what is interferring with the coupler sitting straight, I know now. There's another set of questions for my friends at TrainBoard.com.Now I'll eventually need to score a new shell for that, I suppose. But the rear coupler works and is actually at the right height and everything. But it couples to the coupler height check gauge! A learning experience I reckon. Does Kato sell shells? |
posted by TexasT's at 7:47 PM
![]()
![]()
Comments on "My First Coupler Conversion For a Locomotive Part 1"
-
 Anonymous said ... (Saturday, December 03, 2005 5:25:00 AM) :
-
 TexasT's said ... (Saturday, December 03, 2005 8:17:00 AM) :
post a commentSo here's the problem. In N we need remote uncoulpling but which way to go? Not filled with confidence after reading your difficulties. Spratt and Winkle seem okay, and maybe SD couplers over here, but it's all too hard!
And my nect project is a shunting layout! HELP!
Jules,
Fear not the Microtrains couplers. All's well that's ended well. The coupler is in and well, the pilot is still wrecked but can be replaced fairly inexpensively.
I'm told the KATO F7 (A unit) coupler replacement is one of the most difficult there is. But see my next post.