Feb 26, 2006 - Changes completed - for now...

Feb 24, 2006 - Changing my Template! Bear with me. This is a work in Progress!

www.flickr.com
This is a Flickr badge showing public photos from TexasT's tagged with modelrailroading. Make your own badge here.
My Photo
Name:
Location: Houston, Texas, United States

It ain't the years, It's the mileage. I was raised a military brat, and wanderlust still comes over me every 3 or 4 years. Still love to travel.

Saturday, November 26, 2005

I Never Did Mind the Little Things...

Just a small issue...

I noticed yesterday...
As I threw the switch leading into the passing siding, it was floating. Literally. Floating above the cork about an 1/8 to 1/4 inch whenever the switch was thrown. It looks like the caulk I used has released the track leading into and away from the turnout. Must be a combination of the humidity and temperature fluctuations in my construction area (my garage) and perhaps not using enough caulk in the first place.

Just a small job right? (Not!):
  1. Spray trackage with water (fill sprayer)
  2. Find small spatula on messy workbench
  3. Decide to clean messy workbench so as to facilitate finding said spatula
  4. Put away tools
  5. Put away supplies
  6. Clean up foam debris
  7. Sweep floor
  8. Discover trashbag in trashcan is full
  9. Change trashbag
  10. Discover BIG effing hole in said full trashbag whilst removing from said trashcan
  11. Sweep floor (again)
  12. Pickup floor debris (again)
  13. Put in trashbag
  14. Put trashbag in trashcan
  15. Remember original job
  16. Get small spatula from toolbox
  17. Slide small spatula between track and roadbed to (further) release the track
  18. Let roadbed (and track) dry
  19. Re-caulk roadbed
  20. Discover track feeders are mangled
  21. Get new set of track feeders (supplies on hand)
  22. Install said track feeders
  23. Re-install track
  24. Clamp (gently) track to roadbed
  25. Take (well deserved) break
Obviously some organization is needed here ?!?

Friday, November 25, 2005

Project: Code 55 Test Track

Worked on the track today. Took the thing outside to take a couple of pictures. After I ran them through Paint Shop Pro though, I thought it came out a little too red. The camera (or the software) sees differently that we do.

Photo 1 - I ran this one through the one step photo fix in Paint Shop Pro.
RustyRails0005

Photo 2 - Almost the same angle but no photo fix.
UnretouchedRustyRails0005


Got most of the fascia cut. Nothing left of the wood to do except the front. I'm almost ready to finish up with the permascene. As soon as I finish the wood, I'll lay some more permascene and then I'll give every thing a coat of paint. After that maybe I'll work on some of the ties. Then it'll be time to ballast the track.

How about a few more pictures...
1RustyRails0001

1RustyRails0002

1RustyRails0003

1RustyRails0005

1RustyRails0006

1RustyRails0007

Wednesday, November 23, 2005

Project Test Track

Rusting the rails.

I've never been a rivet counter as N Scale is pretty small. But was reading a discussion thread on Trainboard about weathering rails. Do I want to go to that much trouble?
Suggestions were:
  • To paint the rails "rail brown" with a 00 brush. Then individualize the ties with several drybrushed colors.
  • Find some sort of paint pen that comes in a brown color. Poster couldn't remember the brand though.
I thought we had a fine tipped "sharpie" in brown around the house. But no luck finding it. Hit the local Hobby Lobby Got a brown permanent marker that had a chisel applicator on one end and a "point" on the other. Found a fine tipped brown sharpie as well. Not sure which will win out in the end. I kinda like the color of the permanent marker better than the "sharpie".

The "sharpie" paints well but the color may be too dark. It looks nearly as dark as the ties...plus it seems to leave some kind of a sheen on the rails.

The permanent pen seems to get the color about right.

I painted two stretches of track. One with the "sharpie" and the other with the permanent marker. Gonna let them dry overnight to see which one has colored the rails the best.

Tuesday, November 22, 2005

The Past Few Weekends I've Seen Some Great Layouts...Part I

Running a little behind on postingAbout the layout tours I've been on. This is gonna be a big post.

I've heard that this is one of the only areas in the country to do a Holiday Layout Tours thingie. I don't know if it's true - But if it is - You owe it to yourself to get out and see some of these! I've been amazed. The weekend before last I was bemoaning the fact there hadn't been any Nscale to see. Well, now I've seen some "N" the past couple of weekends. And I took tons of pictures too. Of course one of the good things about digital is you can "delete" those awful shots before you have "prints". The original photos were taken with 3M setting on my camera so they are pretty big. 1280 X 960 seems about average. I apologize in advance to dialup users.

That said, let's see some layouts! By the way there are more pictures on my flickr account. I've organized some sets by layout. If you like what you see, click the link I'll post with the specific layout.
____________________________________________________________________
So let's start with Saturday November 5th.
BobWerre3
First stop was Bob Werre's S Scale UP, CNW, SOO and Milwaukee franchise.

BobWerre6S scale is HUGE!! Layout has about 250 feet of doubleloop mainline with 5 small yards and a large one as well. Features are: Mostly hand laid turnouts, Code 100 and 126 flextrack, DCC control, Sound in many units, Dozens of scratch built, kit, and kitbashed structures. The detail level on this layout is amazing. So many little scenes.

BobWerre7


Bob says the layout is about 80 percent scenicked. Looked higher to me. The man, in my opinion is an artist in the true sense of the word! My pictures do not do this layout justice...If you get a chance to see this layout - RUN don't walk!

10 Photos of this layout on Flickr
____________________________________________________________________

RiverCityUnionTerminalRR15Next stop: Bob Barnette's River City Union Terminal Railroad.


This HO scale pike takes up one side of a two car garage. Represents a midwestern gateway terminal (St. Louis) and line extending Southwest. Missouri Kansas and Texas, Texas and Pacific, and MOPAC equipment. Built with a Helix and lower level allowing point to point operations.


RiverCityUnionTerminalRR45Features:
  • 6 track passenger terminal
  • A coach yard, mail, express with team tracks and freight houses
  • Control is DCC by Digitrax.
  • Scenery is 60 percent complete.


RiverCityUnionTerminalRR6

____________________________________________________________________

Next Stop - The Houston N'Crowd

Located on the second story of Papa Ben's Train Store the N'Crowd is in the process of building a new double decked layout in the clubroom.

HoustonNCrowd11

HoustonNCrowd3They had a few modules setup (including an O Scale layout!) in the room next to the club room and were running trains via DCC.

Still have the famous "N to the Future" cars from the 2003 N Scale National Convention collectors cars available.

Guests can run a train on the Modules they have setup.


HoustonNCrowd125 19 Photos of the N'Crowd available on Flickr.


Note: The club is not ADA accessible.


___________________________________________________________________

Last Stop for Saturday - Gordon Bliss' The Santa Fe / All The Way Railroad

I was getting kind of tired after my last stop at the N'Crowd's clubhouse. I asked one of the members that was there if it was worth the trip to Crosby to see this railroad. All he said was, "Gordon's? Oh yeah...It's worth the trip." Gordon is apparently a very active member of the N'Crowd gang.

So off I went to the east side of town.

SantaFeAllTheWay75

SantaFeAllTheWay16Gordon's Santa Fe empire takes up the space of a two car garage and then some. This is one huge Model Railroad. The pike has a 20' x 30' main room, with a 8' x 13' side room (for dispatching and staging yards). This N scale double deck layout will feature operations on the SANTA FE from Chicago to Los Angeles in 1953. Gordon is very friendly guy and most knowledgeable. He should be...I think I heard him say he had been modeling since he was nine or ten years old!


SantaFeAllTheWay45Features:
  • Both freight and passenger yards in Kansas City are modeled.
  • 2 double track helixes.
  • Blue foam 85% installed.
  • The wiring for detection is almost completed.
  • Control is Digitrax radio DCC.

Gordon's railroad is an example of what can be done given enough space! Very impressive. This is one large N Scale railroad. The photos I took definately cannot do justice to this pike!


SantaFeAllTheWay10

Kind of off the beaten track, but if you get a chance to tour this one, do yourself a favor...GO! As the man says, You'll be glad you did.

21 photos of "The Santa Fe / All the Way" available on flickr.

Monday, November 21, 2005

Project: Test Track: Tunnel Portal – Weekend of November 19

I had decided to install a tunnel portal in the end of my test track. This also turned out to be a test, as I had never used a tunnel portal on a layout before. The last layout I constructed was a cookie cutter type and did not include any underground track. Working with foam board was a new experience as well.

Before ShavingI had sandwiched 3 pieces of foam board together, secured by good old Elmer’s Glue All. I clamped the assembly together and let it dry overnight. I tried cutting or slicing the foam to shape. This particular attempt didn’t really provide the results I was after. It was just plain fugly. I could not seem to get the contour I was after for that area. So I cut to fit the space and glued together three more pieces of foam board and set them aside to dry.

I had heard in various places about a tool that could be used for shaping foam made by Stanley. I had seen what this tool was capable of at Gordon Bliss’ layout, All The Way With Santa Fe! His huge layout (Takes up the space of a 2 car garage and them some!) makes extensive use of foam.

I had to make a trip to the local Home Depot for some hollow wall anchors to re-mount a CD or Video cabinet in the den. My son (I wasn’t at home at the time) had the bright idea before the non-event (for us, anyway) of Hurricane Rita to pull both the cabinets off the wall and cart them upstairs along with the CD’s and Video’s. His mother, the Queen, endorsed this little project. Fortunately, for all involved, the task of getting even one of them off the wall proved to be more of an effort that either of them were willing to expend energy on at the time. I had used sheetrock screws to secure the cases at the time of installation and miracle of miracles, had hit a stud behind the top bracket. When the bottom screws were removed the top one had held. Now, however since I was going to have to re-do the work, the screws in the bottom bracket, of course would no longer bite as the holes had become somewhat enlarged when they were removed. Hence the trip to the hardware store for molly screws…

SurFormWhile I was at the hardware store, I decided to check out these tools. There are at least (just manufactured by Stanley, alone) half a dozen varieties of the Stanley Surform tool. The tools look like some kind of rasp. I picked a small one out that retails for under six bucks. Since I was unsure of the capabilities of the thing I also picked up a spare blade. For this particular tool the replacement blade (?) for lack of a better term, cost about three bucks.


What a difference! As you pull the tool over the foam, it shaves a layer off. It is kind of messy. But you are shaving foam after all. Depending on how much pressure is used you can shave a lot or a little off. In no time at all I had pretty much the shape I thought should be there. Cool stuff! I definitely, can now recommend Foam as a building medium for layouts. Check out these results.

After Shaving

Thursday, November 17, 2005

Started a New Group @ flickr.com

I started a new Model Railroading group in flickr today. Model Railroading. It is a public group - check it out!
I am a big fan of flickr. It is probably the easiest photo sharing / storing site on the web today. If you can't figure out flickr, then you probably shouldn't be using a computer at all. That's how easy it is...
This group will be a companion to this blog. Sent out a bunch of invites to it today. Like to see where this goes.

Link goes in my links section as well.

Monday, November 14, 2005

Project: Code 55 Test Track - Whotta Difference a Day Makes

I am going to post some pictures of the layouts I've seen in the last couple of weeks- haven't had any time to get it all together.

Yesterday I got the rear and right side fascia almost completed
- No pictures - It's a mess yet. May not EVER be pictures of that part. It has become apparent I need to invest in some decent $aw$. Not this pay period, though...

Click pictures for a bigger view.


Decided to definitely scenick this project. It was up in the air - I mean after all this is only a test track. But every thing else about this project has been a test, so why not test myself some more.


Got Permascene? I do. But I don't think I have enough for a full size layout, so I'm using it on this project.

Permascene
is this wonderful stuff made by a company named Perma-Craft. I haven't heard anything about that company for a while so I suppose it's possible they went out of business. Can't find any real reference on the web, either.


What a difference spreading this stuff around makes!
Sure takes the shine off. Seems to cover pinkboard just fine too...


2005_1107 test track0007Before...


TestTrack0008

....and after.


TestTrack0010I had the tinting kit too, but whatever was in the jars had solidified and I presume are no good. I haven't pitched them yet, but they are close to the trash can. So I'll just paint everything. I may try adding some water to one of the jars...Just for grins.
TestTrack0003The material itself always reminded me of Vermiculite. I see in the latest issue of Model Railroader, Lou Sassi used fine vermiculite as a substitute for Permascene for his "Ground Goop" recipe, so I presume they are very similar.

TestTrack0008So I mixed a batch just to make sure it was still viable. And it seemed to be doing it's thing as I spread it around. Before I knew it I was out and so went to the kitchen sink and mixed another container. Back out to the garage, where it became quickly apparent I had put in too much water (permascene should have the consistency of thick oatmeal for most applications). No problem though, just add another teaspoon and as Goldilocks said, it was just right.


TestTrack0009I found a tunnel portal in one of my myriad boxes of supplies and decided to add it just for fun! Check it out!

TestTrack0004


Sure beats the hell out of the gaping hole I constructed on the end.

Wednesday, November 09, 2005

Did a little Railfanning

While I was out and about this weekend. Honestly, if I have the camera with me, and I'm alone - I'll always be on the lookout for a good picture (not necessary to be Rail related either). If I can safely stop I will...


BNSF GP38-2
Shot of a BNSF SD38-2 in Rosenberg, Texas. Took this shot looking through the wrungs in the fence at the Rosenberg Railroad Museum.

Wig Wag Large
The museum has a bit of equipment setup there on the grounds. A couple of semaphore signals. An old Speeder (maybe being restored) A Wig Wag signal. A Signal Tower(!). What looks like someone's old business car (Quebec)in the process of being restored. Haven't been inside the Museum. The Fort Bend Model Railroaders also setup there. (more on them later with pictures)


Wig Wag on the grounds of the Rosenberg Railroad Museum


SpeederJPG


Here's a shot of the Speeder


More pictures here in my Flickr Set.

Tuesday, November 08, 2005

Model Railroad Layout Tour Rules of Etiquette

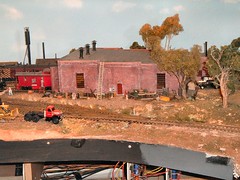
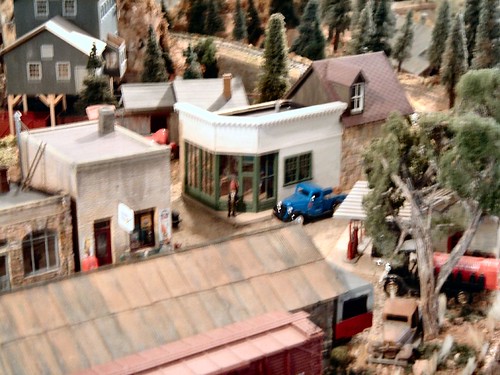
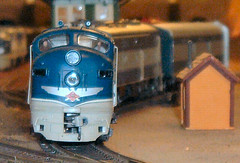
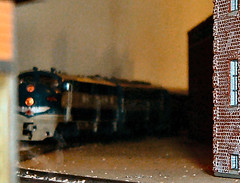
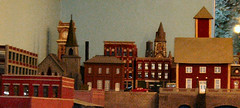
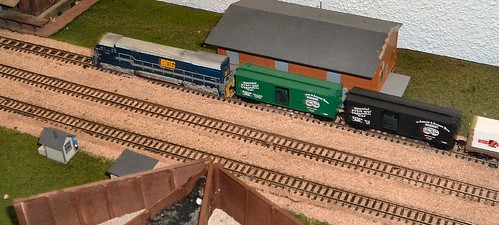
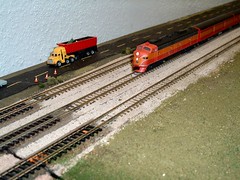
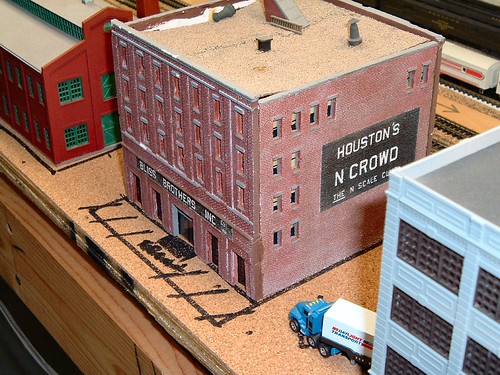
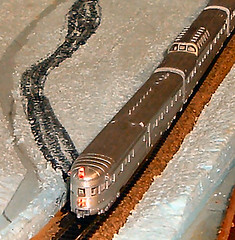
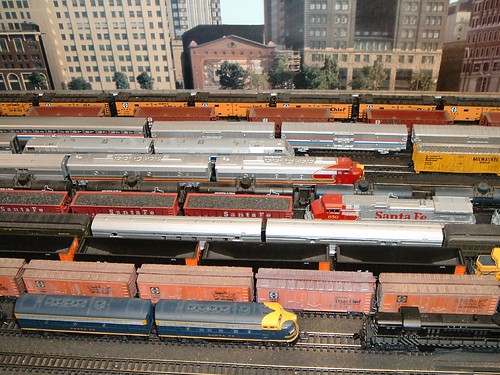
November is National Model railroad Month. Get out and see some Layouts. (This means you, Guppyman!) Get inspired and then build your own! Then we'll all come see yours as well!

I've had a lot of fun this fall with MR related stuff. Been in a lot of homes the last 2 weekends (with more to come!). And I've got a lot of photos to share. I just haven't decided on a format for these posts yet. Gimme a day or two...I managed to get a lot of nice pictures. Digital is a great thing. Same rule of thumb applies for digital as analog pictures, though. For me anyway, for every good shot it seems like I toss 5 or 6 bad ones. (Sometimes more!) I've probably taken over four hundred photographs. A fraction of which will be displayed here. The rest (Those worth keeping anyway) I'll have on Flickr with public access. That being said...

Based on what I've seen (and heard) I thought this would be timely. These rules are published right along with the 2005 Fall Holiday Layout Tour Information. My comments, if any, will be in Bold RED Text.

Read the rules! Know the rules! Share the rules! Be the rules!

Above all when touring other people's layout, be courteous and for god's sake use common sense! (Trying not to sound too preachy here, but...)

By simply following these rules you will enjoy our hobby more and (hopefully) the layout owners will continue to eagerly participate in future tours.

And now, here are those respectable rules of etiquette:

  1. Use common sense. Think before you act is, by far, the most important thing. It really is!
  2. Never pick up someone else’s model. Any model on the layout may have fragile details that could be damaged if mishandled. If you see a train derail or separate, notify the owner or someone operating the layout, as quickly as possible. They will either correct the situation or ask you to; then and only then you may do so. With advanced modeling techniques, you may not recognize the difference between a new model and an operating delicate antique or the difference between a store bought and someone’s “award winning” scratch built model. These things, by their very nature are fragile, don't touch unless asked to by the owner!
  3. Never lean on or over someone’s layout with or without scenery. When carrying children, do not to hold them over the layout, dangling feet can do more damage than a Texas tornado. Sometimes pointing to details on a layout does not allow you to “see” an approaching train, and just because one train has passed does not mean another one may not behind it. Also, leaning over the layouts can make you loose your balance.
  4. Don’t touch, scratch, feel, move anything, or reach over the layout. Loose articles of clothing or jewelry have been known to “catch” scenery and/or derail trains. If you lack self control, put your hands in your pockets or hold your hands behind your back. If you are really curious about anything, simply ask the host. The owner may be too polite to kill you on the spot, but I might not be!
  5. Never smoke in someone’s layout room or home. If the host or owner isn’t smoking, don’t ask for permission. Good rule of thumb - Just don't ask and don't do it (and I smoke)
  6. Don’t nit-pick.” Everyone is entitled to their own artistic creativity, even if it is not yours. Some may historically model a railroad and others may make up their own.
  7. Don’t be so quick to point out a “better way” of doing something. You may find it has been tried with failing or “less than satisfactory” results.
  8. Be tolerant of all scales and skills. If you can’t say something nice, well…Some owners could abide by this as well. I had a sketchy experience at one place...
  9. Do sign the host’s guest book.
  10. Respect the host’s property, both inside and outside of the home. Duh!
  11. Thank the host(s) when you leave, for allowing you into their homes.
  12. Don’t dominate the host’s time, while you are there. Other people may have questions or comments too. The same applies to the best viewing or photo spot, let everyone have a turn and enjoy the layout.
  13. Be patient. Many layouts will be crowded because everybody loves trains.
  14. Know these rules. If you are bringing someone with you that isn’t familiar with the rules of etiquette, take some time and go over them together. You will do everybody a real big favor.
  15. Have fun! We love our layouts and hope you will enjoy them as well. This is a wonderful hobby, meant to be shared, and it is intended to be lots of fun! If you ain't having fun, do everyone else a favor and STAY HOME!
  16. While visiting a model railroad layout, if you get an uncontrollable urge to “do something” besides build your own layout, refer to rule #1.

Of all the rules, the one thing not covered is photography. If you must video or photograph your tour experience, do so with hand held equipment only. Most of the layouts have narrow aisles, to accommodate more model railroad real estate (you know, for more trains and scenery). Maybe consider this idea; leave the camera at home and ask the owner about coming back another time to video or take pictures when it is less disruptive and fewer people interfering with those “good shots.” There has never been a recordable incident of an owner turning down such a request. I personally have never been turned down when asking if I could take a few pictures while on the tour. But again use Common Sense - If it is crowded - Wait.

I even had one guy ask if I wanted a shot of the owner with his Railroad(!) I said sure, but all we got in the shot(s) were his hands. Next year!

Monday, November 07, 2005

Project: Code 55 Test Track - Progress

I bought a gallon of flat tan latex paint from Home Depot today...
For 5 BUCKS!!!
Was in thier OOPS!! cabinet. Steal!!!

Project: Code 55 Test Track - Progress

Been out on the last couple of weekends looking at folks' layouts and so haven't spent much time working on my little project.

So here's what I have managed to get done...My last post about the track2005_1107 test track0001 indicated I had a set of choices to make. So I guess I went with choice "E". None of the above. What can I say?

Pardon my messy workbench.

I've laid the track, using latex caulk to secure it. The feeders are in and I've tested as I gone along. Looks like I managed to keep it all in guage as well. I've checked it with a NScale guage.

2005_1107 test track0006I've gotta confess...I couldn't wait. Pulled my Kato F7A unit out of the case. Set it on the track. Applied power to the raills...That F7 ran. OhMyGod(!) It ran..After years in the case.

Said a little prayer to the electricity gods...

It balked a little at the lined switch. I think I've got a break in coming. Might have to build a little loop on the floor for that. But she ran thru the curve on the switch like nobody's business. And just as quiet as the first day I put it on tracks.

Kato makes a great product no doubt about it. Wow!

2005_1107 test track0005Ouch! Looks like I need to shim that switchstand a little.

So, I've had some lessons in adhesives courtesy of the Nscale group on Trainboard.com.
No problems with any of them, other than the white caulk sticks out (shows) pretty bad. Will have to do something about that soon. Here's the way I've applied them:
  1. Used white glue to attach track plan (paper) to foamboard.
  2. Used Liquid Nails to attach foamboard to wood.
  3. Used Liquid Nails to attach cork Roadbed to paper covered foamboard.
  4. Used Latex caulk (no silicone) to attach track to roadbed. Bought white 'cuz the local HD was out of (or maybe does not stock) the clear.